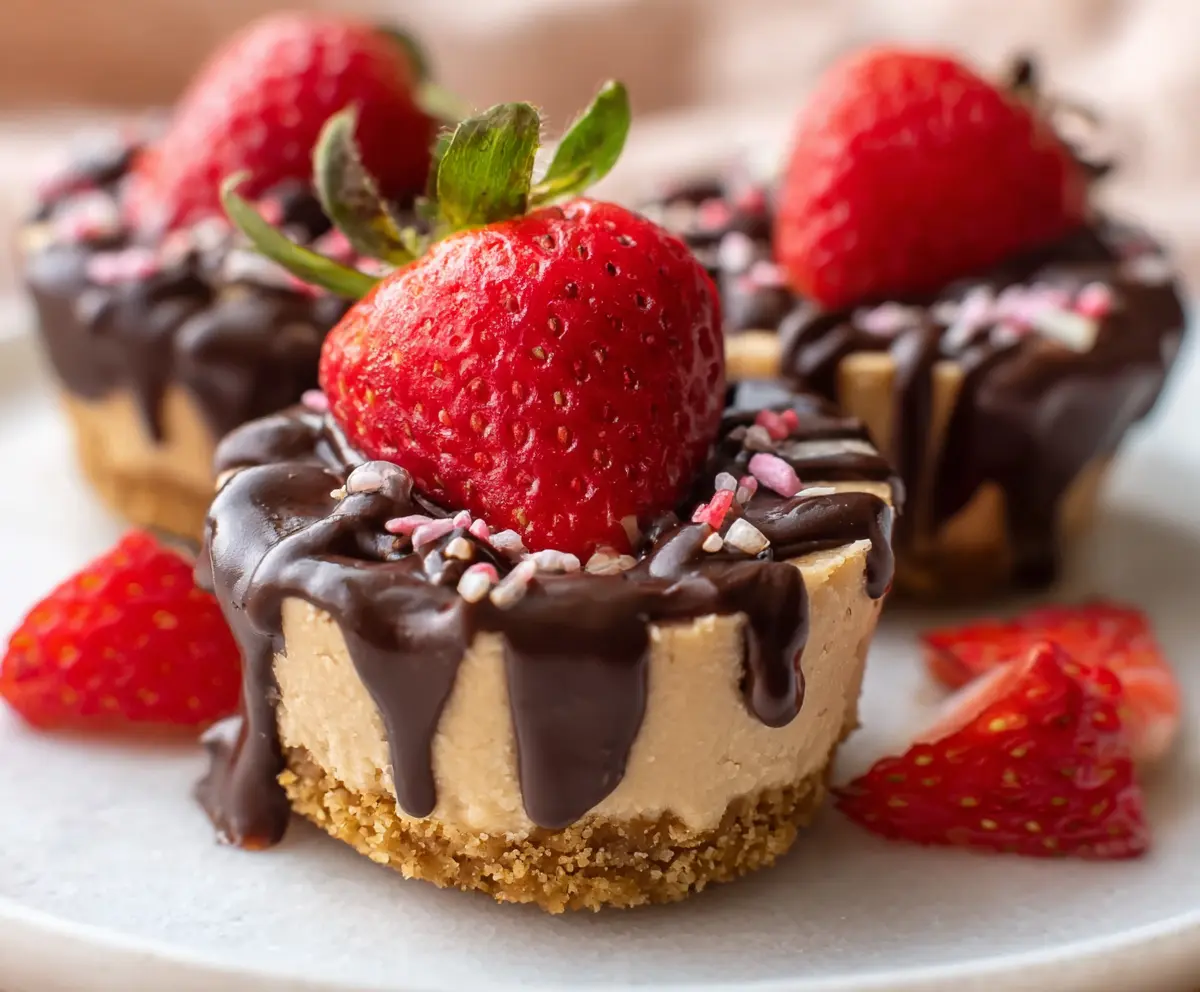
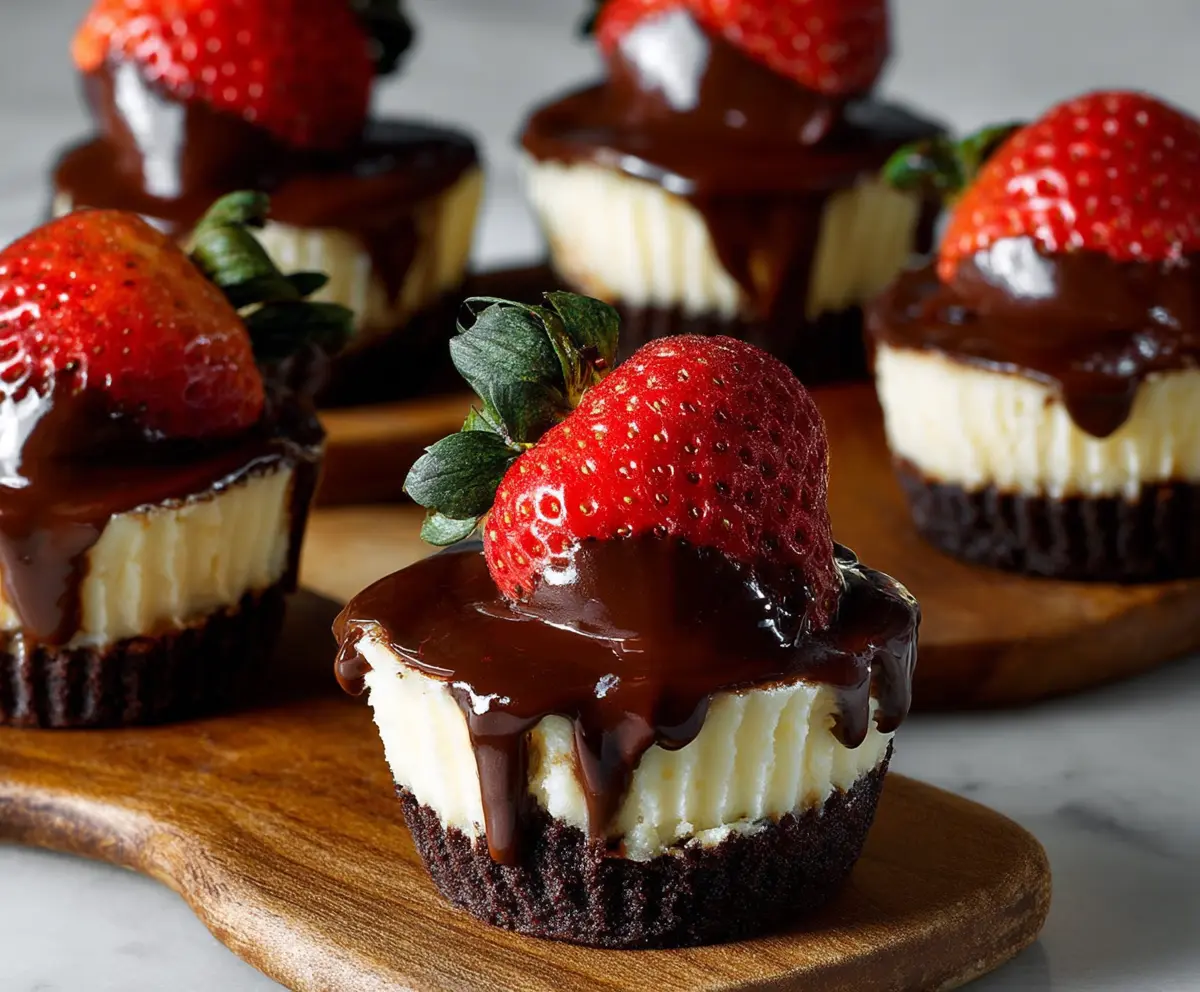
No-Bake Chocolate Covered Strawberry Cheesecake Cups are a delightful treat that brings together creamy cheesecake, juicy strawberries, and a rich chocolate topping—all without turning on the oven. These little cups are the perfect balance of sweet and tangy with the smooth cheesecake filling and the fresh burst of strawberry, all wrapped up in a crunchy base and a luscious chocolate layer on top.
I love making these when I want something special but easy, especially if I’m short on time or just don’t want to deal with baking. What’s great is that you can prep them ahead of time and keep them in the fridge, so they’re ready whenever the sweet tooth strikes. Plus, the chocolate drizzle adds that extra touch of indulgence that makes these feel like a fancy dessert, even though they’re so simple to put together.
My favorite way to serve these cheesecake cups is chilled, with a few extra fresh strawberries on the side. They always get compliments and are a hit at parties or family gatherings. I find that the combination of textures—from the crunchy base to the creamy filling and smooth chocolate—is what makes these cups really fun to eat. If you enjoy strawberries and cheesecake, you’re going to love this easy and delicious treat!
Key Ingredients & Substitutions
Graham Cracker Crumbs: These make the crunchy base. If you don’t have graham crackers, digestive biscuits or vanilla wafers work well. Just crush them finely. I like the classic flavor graham crackers add, but feel free to switch it up.
Cream Cheese: The star for a creamy cheesecake filling. Softened cream cheese blends better and gives the smooth texture you want. For a lighter option, try using Neufchâtel cheese which has less fat but similar taste.
Strawberries: Fresh diced strawberries add a juicy burst inside the cheesecake. If strawberries aren’t available, raspberries or chopped cherries could be tasty alternatives. Fresh fruit keeps the filling fresh and bright.
Heavy Whipping Cream: Whipping the cream until stiff peaks is key to a light texture. You can try coconut cream for a dairy-free version if needed—just chill it first and whip similarly.
Chocolate Chips: For the drizzle topping, go for semi-sweet or dark chocolate chips. You can use milk chocolate if you prefer it sweeter. Melting with a bit of coconut oil or butter helps it drip smoothly and set nicely.
How Do You Get the Perfect No-Bake Cheesecake Filling?
Making the filling light and smooth requires a few simple steps:
- Soften cream cheese well so it blends easily without lumps. Let it sit at room temp for about 30 minutes.
- Beat cream cheese, powdered sugar, and vanilla until fluffy. This gives sweetness and flavor.
- In a separate bowl, whip heavy cream until it holds stiff peaks. This means when you lift the whisk, the cream keeps its shape.
- Fold the whipped cream gently into the cream cheese mixture. Use a spatula and fold slowly to keep the airy texture.
- Finally, fold in diced strawberries carefully to distribute throughout.
This approach makes the cheesecake light, creamy, and full of strawberry flavor without using the oven or gelatin.
Equipment You’ll Need
- Mixing bowls – I use large bowls for beating the cream cheese and whipping cream, making everything easier to combine.
- Electric mixer or whisk – helps beat the cream and cream cheese smoothly and quickly.
- Measuring cups and spoons – keep your ingredients accurate so the dessert turns out just right.
- Mini muffin tin or silicone cupcake liners – these make forming the individual cups simple and mess-free.
- Spatula or spoon – essential for folding ingredients gently and spreading the filling evenly.
- Microwave-safe bowl – for melting chocolate and coconut oil easily.
- Refrigerator – to chill and set the cheesecake cups before serving, keeping them fresh and firm.
Flavor Variations & Add-Ins
- Use other fruits like blueberries, raspberries, or chopped cherries in the filling for different flavors and colors.
- Swap the chocolate drizzle for caramel or white chocolate for a different sweet topping.
- Add a splash of liqueur, like Grand Marnier or Chambord, to the filling for an adult twist.
- Mix in chopped nuts, such as almonds or pecans, into the crust for extra crunch and flavor.
No-Bake Chocolate Covered Strawberry Cheesecake Cups
Ingredients You’ll Need:
For the Crust:
- 1 1/2 cups graham cracker crumbs
- 1/4 cup granulated sugar
- 6 tablespoons unsalted butter, melted
For the Filling:
- 16 oz (450g) cream cheese, softened
- 1/2 cup powdered sugar
- 1 teaspoon vanilla extract
- 1 cup heavy whipping cream
- 1 cup strawberries, hulled and diced (plus extra whole strawberries for garnish)
For the Chocolate Topping:
- 4 oz (115g) semi-sweet or dark chocolate chips
- 1 tablespoon coconut oil or unsalted butter
- Sprinkles or crushed freeze-dried strawberries for garnish (optional)
How Much Time Will You Need?
This recipe takes about 20 minutes to prepare, plus at least 4 hours or overnight to chill and set. Allowing the cheesecake cups to chill fully gives the best texture and flavor. The final chocolate drizzle needs around 15-20 minutes to firm up once chilled.
Step-by-Step Instructions:
1. Preparing the Crust
Combine graham cracker crumbs, granulated sugar, and melted butter in a medium bowl. Stir together until all crumbs are evenly coated with butter. Press this mixture firmly into the bottom of a muffin tin lined with parchment paper or silicone cups. Make sure it’s an even layer. Pop the tin into the fridge to chill while you make the filling.
2. Making the Cheesecake Filling
In a large bowl, beat the softened cream cheese with powdered sugar and vanilla extract until the mixture is smooth and creamy. In a separate bowl, whip the heavy cream until stiff peaks form—this means when you lift the whisk, the cream holds its shape. Gently fold the whipped cream and diced strawberries into the cream cheese mixture, combining everything carefully to keep it light and fluffy.
3. Assembling and Chilling
Scoop the cheesecake filling evenly over the chilled crusts in the muffin cups, smoothing the tops with a spatula. Cover and refrigerate for at least 4 hours or overnight until set and firm.
4. Adding Chocolate and Garnishing
When ready, melt the chocolate chips with coconut oil or butter in a microwave-safe bowl. Heat in 20-second bursts, stirring well in between, until fully melted and smooth. Drizzle the chocolate generously over each cheesecake cup, allowing some to drip down the sides. Place one whole strawberry gently on top of each cup so it sticks to the chocolate. If you like, add some colorful sprinkles or crushed freeze-dried strawberries on top while the chocolate is still wet for a pretty finish.
5. Final Chill and Serve
Return the cups to the fridge for 15-20 minutes to let the chocolate set fully. Serve chilled, and if you want, garnish the plate with some fresh sliced strawberries for extra fresh flavor. Enjoy your easy, delicious no-bake cheesecake cups!
Can I Use Frozen Strawberries in This Recipe?
Yes, but be sure to thaw and drain them well before adding to avoid extra moisture that can make the filling runny. Pat them dry with paper towels for best results.
How Long Can I Store These Cheesecake Cups?
Store them in an airtight container in the refrigerator for up to 3 days. Avoid leaving them at room temperature for long to maintain freshness and texture.
Can I Make These Ahead of Time?
Absolutely! These cheesecake cups actually taste better after chilling overnight, which helps the flavors meld and the filling set perfectly.
What Can I Use Instead of Graham Cracker Crumbs?
You can substitute with crushed vanilla wafers, digestive biscuits, or even crushed pretzels for a salty-sweet twist. Just make sure to adjust the sweetness accordingly.