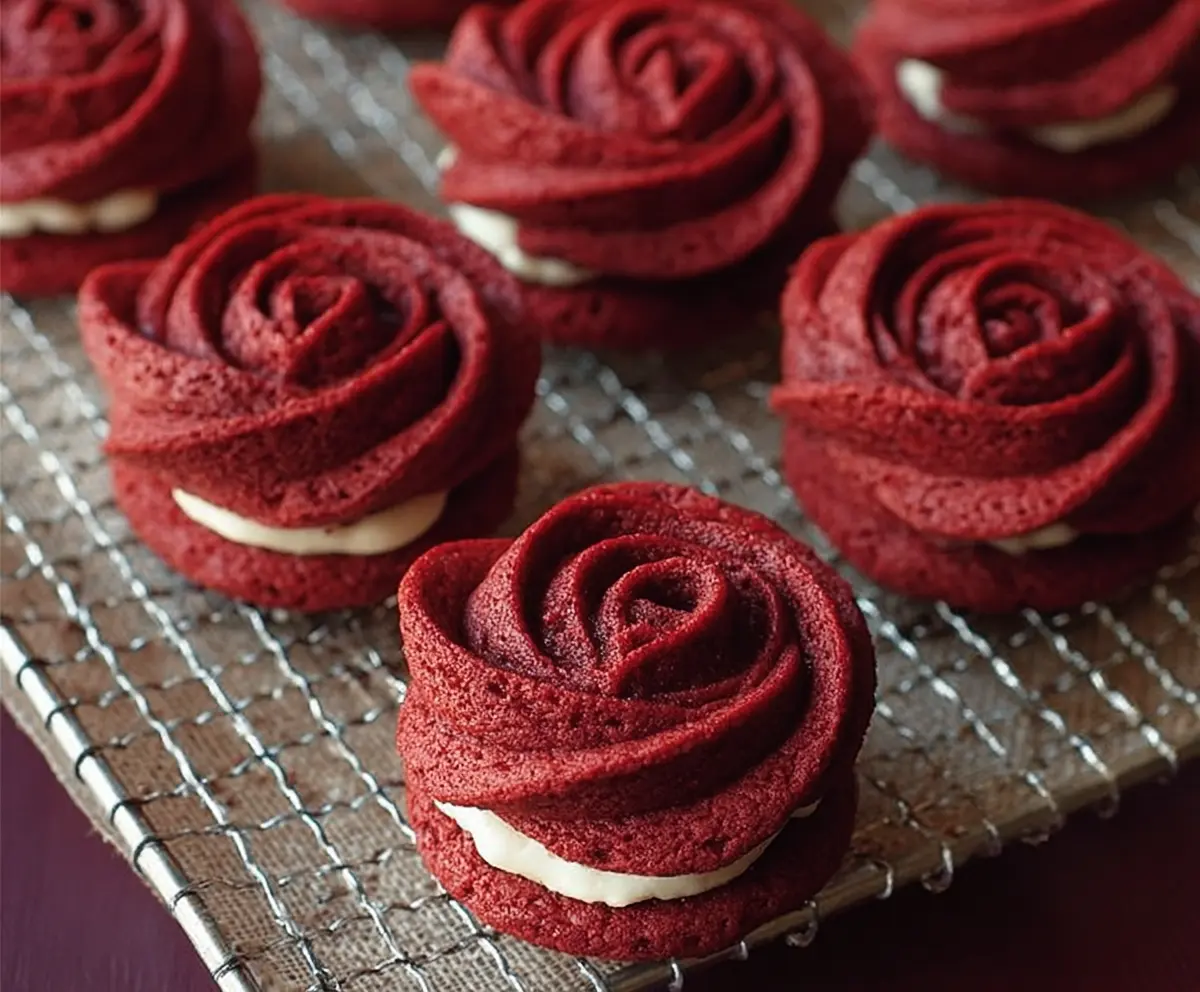
Red Velvet Rose Sandwich Cookies are a charming twist on a classic favorite. These cookies combine the rich, cocoa-flavored red velvet dough with a creamy filling, all shaped into delicate rose designs that make them look almost too pretty to eat. The soft texture and the sweet cream cheese or buttercream center create a perfect bite-sized treat that’s both fun and elegant.
I love making these cookies when I want something special for a party or a gift because they always get compliments. It’s so satisfying to see people’s faces light up when they notice the little rose shapes. If you’re new to decorating, don’t worry—the rose design is easier than it looks, and I’ve found that practicing a little swirl with the dough or frosting helps me get it just right.
My favorite way to enjoy these sandwich cookies is with a cup of hot tea or coffee, especially during cozy afternoons. They also make a beautiful addition to a dessert platter or holiday spread. Whether you’re sharing them with friends or sneaking one out of the batch for yourself, these Red Velvet Rose Sandwich Cookies are a sweet little moment of joy in every bite.
Key Ingredients & Substitutions
All-purpose Flour: This gives the cookies structure. For a gluten-free option, try a 1-to-1 gluten-free baking flour blend to keep the texture similar.
Cocoa Powder: Unsweetened cocoa adds that classic red velvet hint. Dutch-process cocoa makes the flavor smoother, but natural cocoa works fine too.
Red Food Coloring: This gives the vibrant red color. If you want to avoid artificial dyes, consider beetroot powder, but the color will be less bright.
Buttermilk: Buttermilk creates tenderness and tang. If you don’t have it, use regular milk with a teaspoon of lemon juice or white vinegar to make a quick substitute.
Cream Cheese Filling: Using full-fat cream cheese and butter gives the filling a smooth, rich taste. For a dairy-free option, try vegan cream cheese and margarine.
How Can I Pipe Perfect Rose-Shaped Cookies?
Getting that rose shape right can feel tricky, but here’s how to make it easier:
- Use a good-quality piping bag and a large star tip (Wilton 1M or similar).
- Start in the center of your cookie spot and slowly pipe in a spiral moving outward to form petals.
- Keep your hand steady and apply even pressure to get smooth, continuous swirls.
- Practice on parchment paper before piping on the baking sheet.
- Leave enough space between cookies since the dough rises slightly during baking.
With a little practice, your rose cookies will look stunning every time. Remember, they taste just as good even if your roses aren’t perfect shapes!

Equipment You’ll Need
- Piping bag with large star tip – I find it best for creating those beautiful rose shapes. It makes piping smooth and easy.
- Mixing bowls – for whisking dry ingredients and mixing fillings. I like sturdy bowls that don’t tip over when I mix.
- Electric mixer – speeds up creaming the butter and sugar and makes filling smooth. A hand mixer works fine too.
- Parchment paper or silicone baking mats – for lining baking sheets. Keeps the cookies from sticking and makes cleanup simple.
- Cookie spatula or flat spatula – to transfer baked cookies to cool on a wire rack without breaking them.
Flavor Variations & Add-Ins
- Swirl in a teaspoon of peppermint or vanilla extract into the cream cheese filling for extra flavor.
- Add chopped nuts or mini chocolate chips to the dough for added texture and taste.
- Use white chocolate or flavored cream cheese (like strawberry or lemon) instead of plain for the filling.
- Mix in a teaspoon of espresso powder to the dough for a mocha twist that pairs well with the cocoa.
Red Velvet Rose Sandwich Cookies
Ingredients You’ll Need:
For The Red Velvet Rose Cookies:
- 1 1/4 cups (155g) all-purpose flour
- 1/4 cup (25g) unsweetened cocoa powder
- 1/2 teaspoon baking powder
- 1/4 teaspoon baking soda
- 1/4 teaspoon salt
- 1/2 cup (115g) unsalted butter, softened
- 3/4 cup (150g) granulated sugar
- 1 large egg
- 1 tablespoon red food coloring
- 1 teaspoon vanilla extract
- 1/2 teaspoon white vinegar
- 1/4 cup (60ml) buttermilk
For The Cream Cheese Filling:
- 4 ounces (115g) cream cheese, softened
- 1/4 cup (60g) unsalted butter, softened
- 1 to 1 1/2 cups (120-180g) powdered sugar, sifted
- 1/2 teaspoon vanilla extract
How Much Time Will You Need?
Plan for about 20 minutes of prep time, 10-12 minutes of baking, and around 15 minutes to prepare the filling and assemble the cookies. Don’t forget to allow cooling time—about 20 minutes—to make sure the cookies firm up before filling. Total time is roughly 1 hour.
Step-by-Step Instructions:
1. Prepare Oven and Baking Sheets
Set your oven to 350°F (175°C). Line baking sheets with parchment paper or silicone mats to keep the cookies from sticking and make cleanup easy.
2. Mix Dry Ingredients
In a medium bowl, whisk together the flour, cocoa powder, baking powder, baking soda, and salt. This mixes your dry flavors and leaveners evenly—set the bowl aside for now.
3. Cream Butter and Sugar
Using a mixer, beat together the softened butter and granulated sugar in a large bowl until the mixture looks light and fluffy. This takes about 3-5 minutes and helps your cookies be tender and soft.
4. Add Wet Ingredients
Beat in the egg, red food coloring, vanilla extract, and white vinegar until everything is combined well. These ingredients give the dough flavor, color, and a little lift.
5. Combine Dry and Wet Mixtures
Add the dry ingredients into the wet mix alternately with the buttermilk, starting and ending with the dry mix. Stir until the dough is smooth but avoid overmixing.
6. Prepare for Piping
Fit a piping bag with a large star tip (like Wilton 1M) and fill it with your dough. This tip lets you create the lovely rose shapes easily.
7. Pipe Rose Cookies
Pipe dough onto your prepared trays by starting at the center and swirling outward in a circular motion to form petals. Leave enough space between each cookie so they don’t stick together.
8. Bake
Bake the cookies for 10-12 minutes or until they feel set and slightly firm when touched. Avoid overbaking to keep the cookies soft and tender.
9. Cool
Let the cookies cool on the baking sheet for a few minutes, then transfer them to a wire rack to cool fully before filling.
10. Prepare the Cream Cheese Filling
Beat the cream cheese and butter until smooth and creamy. Gradually add powdered sugar until the filling is sweet and fluffy. Stir in vanilla extract. If the mixture feels too soft, chill it for a short time before assembling.
11. Assemble the Sandwich Cookies
Spread or pipe a good amount of cream cheese filling onto the flat side of one cookie. Gently press another cookie on top to make a sandwich. Repeat for all cookies.
12. Serve and Store
Enjoy your delicious sandwiches right away, or keep them in an airtight container in the fridge for up to 3 days. Bring them to room temperature before serving for the best softness and taste.
Can I Use Frozen Butter for the Cookie Dough?
It’s best to use softened butter at room temperature for this recipe to ensure the dough creams properly and pipes smoothly. If your butter is frozen, let it thaw in the fridge overnight and bring it to room temp before starting.
Can I Make the Cookies Ahead of Time?
Absolutely! You can pipe and bake the cookies a day ahead, then store them in an airtight container. Prepare the filling and assemble the sandwiches the day you plan to serve for the freshest taste.
How Should I Store Leftover Sandwich Cookies?
Store them in an airtight container in the refrigerator for up to 3 days. Before serving, leave them at room temperature for about 15-20 minutes so the filling softens up nicely.
What Can I Substitute for Buttermilk?
If you don’t have buttermilk, mix 1/4 cup milk with 1 teaspoon lemon juice or white vinegar. Let it sit for 5 minutes to curdle, then use it as a buttermilk replacement in the dough.